Showing posts with label Projects. Show all posts

Monday, December 23, 2013

Men's Crochet Hat

I got my Christmas shopping done last week, just in time. There is no way that I ever will go shopping two days before Christmas. I have always been the type to have my gifts done early, though this year is a bit of an exception since I have been a bit occupied with things such as having a baby, maybe? Lol.

I needed a couple of small gifts, and I hate trying to figure out a bunch of cheap ones that are something someone might not use anyway... so I decided to crochet hats for the men in my life. I did so last year, but I have been told that they have been worn so much while working that they are getting kind of yucky. So why not make them some new ones? I already gave my dad his hat yesterday, as it was his birthday. Sorry, I didn't get a picture of that one. It was a foresty green color with two thin gray stripes. It came out way cool. That was made with Lion Brand Wool-Ease Forest Green Heather, with the stripes being Grey Heather. I love the texture of the wool-ease, and it is very soft. Not scratchy either!

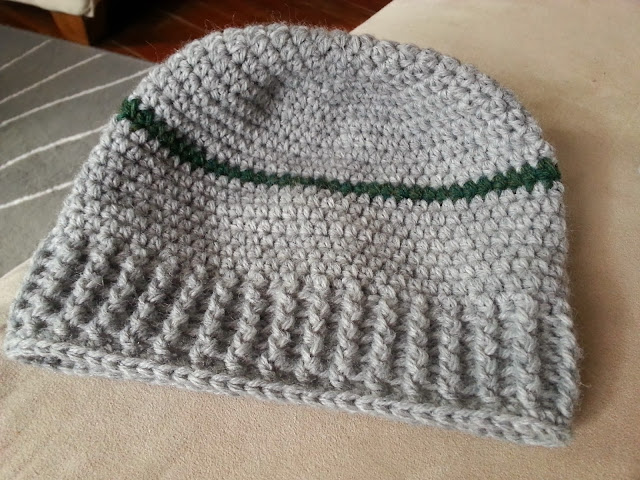
Below are two different hats, but the same pattern. I took Bev's Basic Crocheted Hat and made my own spin with the ribbed look at the bottom. The grey one is the same yarn as the one I mentioned above - Wool-Ease, but the colors are just switched. The blue and red one was made with Caron Simply Soft Dark Country Blue and Caron Simply Soft Autumn Red. This hat came out quite different since the yarn is nothing alike. I like to think it looks a bit more edgy, while the grey hat tends to be more fitting for the "outdoorsy" man.


Of course I have to try them on... the grey looks good on a female too! You could just switch out the stripe for another color or keep it plain. 


I love the versatility of this pattern. You can do basically anything with it! It comes in lots of sizes too. The blue hat was the larger size, while the grey was the regular for a man or woman.

I'm on to the next project... I am beginning to wonder if I should start making money off this stuff on Etsy. Hmmm....??

Thursday, October 24, 2013

Nursery Reveal - Almost Complete!

I have been holding off for so long with getting pictures up of our brand new nursery. Partly because I wanted everything to be perfect before I gave the reveal, and partly because I haven't been well enough to tidy the room up and get some good photos. So I am giving in and posting pictures of what it looks like now. There are still a few things left to do. Like, sew curtains for the window, get a crib skirt, put things on the wall, etc. But for now here you go! This will give you a good idea of what I have been working on for the last little while. I wish it were more perfect at this point, but I know I will get to work on it more after the baby arrives and the holidays are over.

The work done on the room included:
Cleaning it out (that was a chore, as this used to be our storage room!)
Prepping the ceiling and walls
Painting the ceiling, walls and trim
Painting the stripes
Sanding the floor
3 coats of poly on the floor
New light fixture

Thank you to those who showered us with gifts! Some of the items you may see in the pictures, while others are neatly tucked away in the dresser drawers. :) Thank you, also, to my family for all the time and effort they put into helping us get this room done before baby arrives. I am so ever grateful for you guys!

From the doorway. Please excuse the pile of stuff at the end of the bed. It is a container of 3-6 month clothing, our baby tub and some decorations from the baby shower here in MA. 

The crib. Mostly set to go... just going to add a crib skirt at some point... maybe. ;)

The dresser Kyle and I refurbished. It has socks, hats, sleepers, fleecy sleepers and sweaters in it. All the warm, cozy stuff! 


I am in love with the bunting/banner my sisters made for my baby shower. It ties in perfectly with my decor! 

Love this storage unit. The top basket has all our tubby-time stuff in it for now. Middle shelf is shoes and booties. Bottom basket is all toys. :) The basket on top of the unit is all burp cloths.

Our changing station. My mom picked this dresser up at a yard sale, and it is actually supposed to be a baby dresser. It works perfectly as a changing station as well. I love how this turned out. The top drawer is stocked with diapers, wipes, nursing pads, cloth diapers, etc. The right door on the dresser has some nice storage for extra wipes, diapers and a hanging area for her little dresses. The rest of the drawers have her onsies, pants, and blankets.

My husband wanted to keep the bed up for any time his friends may come through and need a place to stay. I will also be using it for nursing at times.
I recovered the Boppy pillow, and the other pillow is from Ikea. The blanket at the end was handmade to tie in with the other items in the room. Our diaper bag is right there, ready to go!


Monday, September 30, 2013

Ikea finds for the baby room

I always plan to get a trip in to Ikea at least once or twice a year. Twice if my husband doesn't mind! There are just so many things and deals there that you can't really find anywhere else. I have been waiting for quite a few months for the trip and had a little money saved up to go. It took a ton of self control to not fill a cart full of tons of things I could use. But, I knew I only had so much to spend, so I reluctantly walked past all the amazing items I wanted and found some things for our baby room. I had been looking online the week before we went so I could price check ahead and know what I needed to get.

For the most part, I kept with what I planned to get - and even found some additional items! I was spot on with the total price. I got a couple Christmas presents knocked off as well, though just small things. But still, it was such a fun day! We took my sister and two brothers with us and had a blast. We ate at the Ikea restaurant and that was really yummy.

Here are the things I got for the baby room. I am just dying to get this room set up! Just keeping waiting... just keep waiting...

These are just the things for the baby room. Again, another peak of the wall color. ;) Here, you can see where the floor is in pretty rough condition. That's what I'm waiting on... my dad is planning to re-sand and poly them at some point. 
This is a spice rack, but I am going to be using it for displaying books!

A new ceiling light - had such a hard time in the light section, because a lot of them are dangling lights that plug in. We are hoping this works out because it only allows a very low light bulb wattage. It basically looks like a lampshade. I love it!

This pillow may seem a bit sophisticated for a baby room, but it is so perfect for my theme. I just had to get it to throw on the twin bed that will be used for nursing and when guests come through.
The plant is a dragon tree?? I don't know - it looked cool, so I thought maybe it might add some color to the room. If not, I have a place for it on my plant stand. 


Aren't you just dying to see this room come together?

Wednesday, September 25, 2013

Baby Nursery Progress

While I don't have any sneak peaks for you, I thought I'd share the good news that the painting is completed in our little girl's room! I have had help from my siblings, mom and hubby with all the work that went into it, which has made it go so much quicker. We repainted the ceiling to give it a clean look, painted the walls my Light French Gray color, painted the trim and baseboard white... and today, I tackled the stripes.

I have never ever painted stripes on a wall before. I will admit I was very nervous to try it. After all the hard work that went into the walls, I didn't want to totally mess them up!

To start, I had to have something to keep me motivated. You can see clearly what that was. ;) This picture actually gives you a very small glimpse of the color on the wall. I only chose to paint stripes on one wall as a focal point.

I am no expert, but they did come out pretty good and at least the lines are all perfect! This took me hours. It is very time consuming to paint stripes, especially if you are on your own. But it is done (minus a couple touch-ups after it is completely dry), and I am happy. :)

I can't wait to finish working in this room so we can move all of the stuff in there!

More soon.


Saturday, September 21, 2013

Crochet Angel Wing Pinafore

I will admit, I am going a little crochet crazy these days. I keep whipping up these baby items, maybe in hopes that it speeds the time up for when I meet my little girl? I don't know. Here is another item hot off the crochet needle. I absolutely love this pattern, and it was very easy to follow.


Front. I just love the little angel wing sleeves. 


This is the back - my husband picked out the buttons! :)


To make this little dress from Bev's Country Cottage, go here for the pattern. I made this with Caron Simply Soft Gray Heather, with the top part being Caron Simply Soft (not sure what this creamy color is called). I also used a smaller hook - size G/4.00mm.


Friday, September 20, 2013

31.2 Weeks + Crochet Baby Outfit

Down to the single digits now (for weeks) with the countdown! Baby Hansen had a healthy heart rate at our last prenatal (150) and seems to be doing a lot of growing. Thankfully, she decided flip head down and enjoys making things more uncomfortable for mama. I am so glad she is cooperating though, and so far she has decided to stay that way. I can now feel her different limbs. That was strange at first, but it is just so amazing how much closer we are getting to being able to hold this precious gift! It is crazy how much love I have for this little one when I haven't even met her. I can only imagine what it will be like when I first lay eyes on her. <3 p="">

I have gone through a few tough days lately, and I would definitely say that this 3rd trimester has been like a roller coaster ride. Since the baby is getting heavier, it continues to put more pressure on my pelvis and back. I already carry low to begin with, so I am just praying God helps me get through the next 9 weeks. I have so much I want to get done, but I have to be careful not to overdo it... as I usually do. 

We still have not even gotten started on the nursery - I have been waiting for so long to work on it, but there's only so much I can do alone. I am hoping we can get it at least painted by my first baby shower on October 5th, so we can have a place to put all the gifts. My dining room and living room are acting as storage for all the stuff in the nursery until we can get it painted. It will be so nice to have everything in its place and I will feel soo much better! 

Below is my latest project for our little girl. This should fit her by the Christmas season, which is what I made it for! Booties, hat and cardigan. The hat is supposed to be a bit large so it can be worn like a slouchie hat. Doesn't it all look so warm?! Pair this with a long sleeved onsie and some cute leggings and she will be so adorable. Yarn used for the outfit is Caron Simply Soft Autumn Red. Go to my older posts for a link to the bootie pattern. The hat was completely made up by yours truly. The cardigan can be found here. I had an incredibly hard time reading her instructions, but it came out okay, I think!


More crochet and other projects to come. :)


Monday, September 16, 2013

More Crochet Baby Booties

I have been a bit obsessed with making these booties. I made two more pairs this weekend and plan on making more! Not all for my own baby, but for others as well. I am guessing that it takes me about 2 hours to make these, give or take. They are so easy now and I love customizing them. The red booties will have a matching slouchie hat here soon. I just can't wait to start dressing my little girl in these adorable, handmade things! 

I did make an adjustment on these two pairs. You will notice that they are taller. I simply repeated two rounds and finished with the scalloped top. These pairs are also much smaller, so they will fit a newborn. Ahh, what a stylish baby. ;)

Again, this pattern is from Ashlee at I'mTopsyTurvy. 


Wednesday, September 11, 2013

Crochet Baby Booties

I have finally pulled out my crocheting again. It has been a busy summer, but I decided it was time to start making some baby stuff. I saw a tutorial for these and couldn't resist. Who wouldn't want to make these stylish, adorable little booties for their baby girl on-the-way?! I have never ever made anything like this before. I always stick to easier, straight-cut projects, so I went out on a limb here. They actually were pretty easy and the second bootie went a lot quicker than the first. They may be slightly imperfect, but that is the awesomeness of handmade, I think!

Go here for the tutorial Ashlee at I'mTopsyTurvy. Very easy instructions.


Loving the scalloped top. So feminine! 


Next pair I make will be smaller and taller, more similar to Uggs. Baby Hansen won't be able to wear these for a few months, but how cozy they will be this winter when she finally can fit into them!


Wednesday, September 4, 2013

Sewing Projects for Baby

I am not an expert sewer - I can assure you of that! But I can at least figure some things out and do a pretty good job. I used to have days in the past (years ago) where I would battle our sewing machine rather than actually getting much sewing done! Thankfully, I have somehow gotten past that and finished some special sewing projects for my baby girl. 

The bumper pads were actually really easy, even for a girl like me! I stretched that project out a bit since I ran out of ribbon. But it would have only taken at the max a few hours from start to finish! The best way to go (I think, at least) is buying the pads ready to go from JoAnn's, especially if you have a coupon! It cost me under $30 to make them, the majority of cost being the Nu-Foam pads themselves. They are pre-cut, ready to use and come with instructions. Easy-peasy!

The small quilting project - not as easy, but more time consuming than anything. Who knows if I did any of it right, but it feels soft (the backing is flannel) and looks okay! All my corners came out awesome except for one. Go figure, right?

I had just a tiny bit left from my quilting strips, so I made a little burp cloth out of it to match. And then two more burp cloths from flannel material.

My nautical theme with a pop of coral!


I just love the whale fabric. It is so adorable! I didn't know what I would use it for when I spent hours picking out fabric last week, but it seems to work well in this quilt. I have lots more that I think I will use to recover my boppy nursing pillow. 

Bumper pad with light coral ties.


The picture is a little too dark, but I did different stitching along the edges. These burp cloths were so quick and easy. I love that I can personalize my baby stuff!


Saturday, August 24, 2013

Before and After - End Table Reburbish

My $3 table/stand/end table ended up being another easy project! Last Saturday I picked it up looking just like this...


And now it is sitting prettily in my bathroom looking like this...


I left the top natural and only polished it up with some wood cleaner. I will eventually line the shelf once I can find some decorative shelf liner again. All the stores seem to be out right now! It fits perfectly outside the shower and seems to work fine. But we will see how we like it. It could work anywhere and be perfect!